
Build your own DIY roof rack

Sweet DIY roof rack with all the fixin’s.
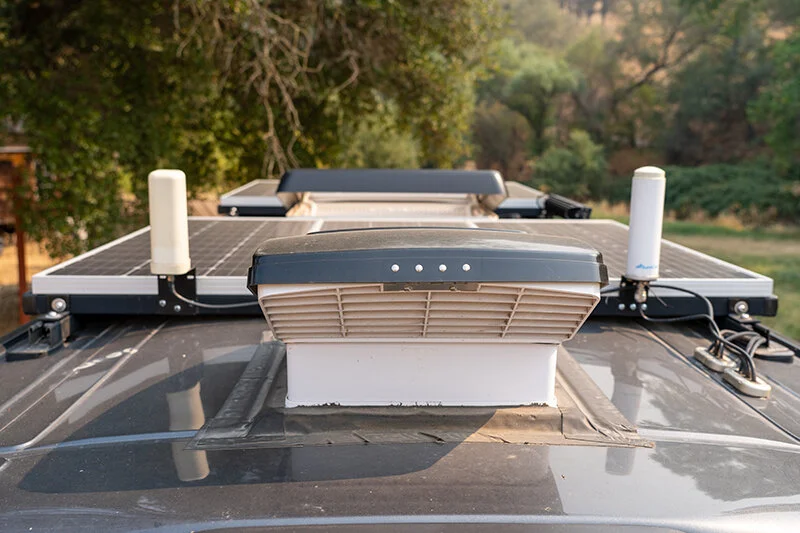
Adding a rack to your roof is a must have when you’re planning on either mounting solar panels or carrying gear on your roof - or maybe even both. There are lots of great pre-fabricated options out there built by various outfitters, but sometimes building your own can be a cost effective alternative. We opted to make our own for cost reasons as well as wanting to be able to configure our roof assembly the way we wanted, We have 600w of solar (we upgraded to 730w in July 2022), a Maxxair fan, a Dometic Skylight, two antennae, and two lightbars on our roof build. Finding a pre-made rack that was going to accommodate all of this and be affordable was an impossible challenge.
While this post is based on the Ford Transit, the general strategy remains the same regardless of van model. Refer to your van’s mounting manual for exact specs and connection points for your vehicle. These specs are taken from the Ford Transit 2019 Body Mounting and Equipment Manual.
General notes from the manual:
5.12.2 Roof Racks and Load Carriers NOTE: The number of load retaining fixtures vary depending on the vehicle.
Ideally, the bearing surface of the roof rack attached should be the same as the reinforcement inside the roof, see figure E176163, item 7 and dimensions X,Y and r
Ensure sealing of surfaces, for example: with EPDM rubber material or equivalent and ensure sealing along the bolt for preventing water ingress into the interior of the vehicle, see figure E176163 items 3 and 5
The thread size is M8. The maximum intrusion of the M8 bolt into the roof is 16mm/0.62 inch, see 'A' in figure E176163
Load not to exceed 79.3kg (175lbs) at individual attachment points for local durability
Load not to exceed 190kg (420lbs) total for roof structure durability
Refer to: 1.12 Load Distribution (page 20). For guidance on center of gravity
When removing the roof rack ensure holes are properly sealed with sealing plugs or equivalent water tight elements For further information please go to the Body Builders Advisory Service, https://fordbbas.com/

Plug removal at mounting point
The first order of business is to identify the plugs (#1 in the image) that will be covering your mounting points, as shown to the right. These are small, round caps that will be located at the locations noted in the image below. They are placed on the vehicle prior to painting, so they will be painted over to match your vehicle’s color. Carefully cut the plugs out using a sharp blade to avoid removing paint from the roof of your van.

Location of existing Plugs and Mounting Points on the roof
Whether you have an extended or standard body vehicle, it may have a different number of mounting points (we will use quantities for the Extended in this post). These mounting points include a hole through the roof and a pre-threaded M8 insert, along with a reinforced plate that rests on the interior ribs. Make sure to use all mounting points to increase the strength of your rack. The rack will be resisting strong wind loads at high speeds, so err on the side of safety always.

Orange space and rack by others
Once you’ve removed the appropriate plugs, you will need to add spacers (#5 in the image) at each mounting location. (ONLY REMOVE THE PLUGS AT THE MOUNTING LOCATIONS - THERE ARE MORE PLUGS ON THE ROOF BESIDES THOSE AT THE MOUNTING LOCATIONS) The spacers are needed to accommodate the curvature of the roof. If spacers aren’t added, your cross-members will sit on and possibly deform the curvature of the roof. We are using these great Impact Products pre-made spacers, as they fit precisely, are canted 5 degrees for level rails, and are sized to ensure that your rack’s weight is evenly distributed on the reinforcement points (#7 in the image below). If you’d prefer a cheaper option, we’ve seen people use Hockey Pucks for the spacers. Hockey Pucks are cheaper, but they will not provide a level top surface for your rack, you’ll have to drill the holes yourself, and they won’t distribute weight as well. You will need 8 - 10 spacers (for the Transit Extended) to match the 8 - 10 mounting locations. Make sure to seal the bottom of your spacer with Dicor or similar sealant to keep water from entering the threaded mounting holes. The Impact Products pre-made spacers have VHB tape on the underside which will keep water at bay. A bead of Dicor around the perimeter of these spacers can’t hurt.

figure E176163 Mounting location with orange spacer (#5) - part #4 is a rack system not used in this post

Diagram Key
Once your spacers are located and permanently placed, it’s time to mount your lengthwise rails. For our rails, we suggest using slotted 1-5/8” aluminum Unistrut. Some people use “80/20” aluminum extrusions, which is a perfectly reasonable choice, but is more expensive than Unistrut (roughly twice the cost). We actually used powder-coated steel Unistrut, but will use aluminum on our next build as it is lighter weight and plenty strong for the application - and our powdercoat is starting to fade. (The total weight of our steel Unistrut is 75lbs, whereas aluminum will be less than 40lbs). For the Extended Transit, we found that the stock 10’ Unistrut extrusion worked quite well without any modifications for our length-wise rails.
Place the 10’ Unistrut rail on the spacers on one side of the vehicle. Slide the Unistrut lengthwise to align the slots with the holes at the mounting points. Using a washer and M8 bolt, fasten the rail to the spacer. We highly suggest using Locktite thread locker to ensure that the bolt doesn’t loosen due to vehicle vibration. After the bolt is screwed in, blob the top of the bolt and slot with Dicor to ensure that water won’t enter the roof hole. Just for good measure, we added a strip of Eternabond over the top of the assembly for additional waterproofing. Repeat at each mounting location on both sides of the roof.
Now that your lengthwise rails are securely mounted to the roof, it’s time to connect the cross members. How many cross members you’ll need will depend on the configuration you are trying to achieve. We are using 4 cross members, which are used to attach 2 rows of Renogy Compact 100w Solar Panels (our updated panels are two 365w Hyundai panels). Each row has 3 solar panels (update is one panel per every two cross members), which gives us a total of 600w (now 730w) on our roof. The cross members are 5’ long 1-5/8” Unistrut slotted extrusions. We drilled holes on the underside of the panel frames and bolted them through the slots in the strut channel (we also bolted the panels to each other for additional stability). Before connecting your cross members to the roof, we suggest attaching the solar panels or other gear to the cross-members first. This will make your life far easier when installing them on the lengthwise roof rails. We used zip-ties (through the strut slots) to organize the cables from the panels so that they ran along the cross-members and didn’t end up jiggling on the roof while we were driving. This will be impossible to do once the cross members are mounted, so do it prior to affixing them to the roof.

Top view of rack assembly with dimensions
Before mounting the cross-members to the roof, you’ll need to drill holes on both ends of them so that they can be bolted to Corner Strut Channel Brackets. These brackets will then be fastened to the length-wise rails already affixed to the roof. Measure the center-line from one length-wise rail to the other. Transfer this dimension to all cross-members. This process may be easiest by just laying the cross members on the length-wise rails on the roof and marking them using the hole in the Corner Strut Channel Bracket. We measured 57.65” from driver side to passenger side mounting hole, but make sure to verify on your vehicle. Drill the appropriate holes in all cross- members.
Corner Strut Channel Bracket
Strut Channel Nut with Spring
Refer to the images below for this step. Attach the Corner Strut Channel Brackets to the cross-members, so that there is one bracket at each end of each cross-member (8 total for our configuration). Place the cross-member assembly on the roof and then use Strut Channel Nuts with Springs to fasten the cross-member assembly to the length-wise rails. Rotate the nut 90 degrees to insert it into the channel, then push down on the nut and twist it back 90 degrees to lock it into the channel. Make sure to use Locktite thread locker on all fastener locations to ensure that they won’t vibrate loose over time.

Axon view of rack assembly

View of cross-member connection to length-wise rail

Side view of cross-member connection to length-wise rail

Obscure view under Solar Panel
This completes the assembly for the roof rack. We added some additional items to the roof beyond our solar panels. We added a 52” light bar to the front of the rack by drilling corresponding holes and bolting the bar to our forwardmost cross-member. We used the same strategy to add our antennae to the cross-member at the rear of the assembly for our sweet internet setup. We added Eye Bolts for our DIY Awning. Lastly, we used channel nuts to attach a 22” LED light bar above our sliding door. We also ended up using the lengthwise channel as a chase for our cable runs to the rear of the van, where they enter the roof.
Price breakdown for Aluminum Strut Roof Rack:
$3.22 (25 pieces) High-Strength Steel Nylon-Insert Locknut - 1/4”-20 thread
$ 20.32 (8 pieces) 18-8 Stainless Steel Flanged Button Head Screw - 1/4”-20 x 3”
$6.83 (10 pieces) 18-8 Stainless Steel Button Head Torx Screws - 1/4”-20 x 1-1/2”
$9.33 (10 pieces) 316 Stainless Steel Flanged Button Head Screw - M8 x 1.25 mm Thread, 40 mm Long
$9.60 (25 pieces) 316 Stainless Steel Washer - Oversized, 1/4" Screw Size, 0.281" ID, 0.75" OD
$123.68 (4 pieces) Aluminum Slotted Hole Strut Channel - 1-5/8” x 1-5/8” x 5’
$110.68 (2 pieces) Aluminum Slotted Hole Strut Channel - 1-5/8” x 1-5/8” x 10’
$13.84 (8 pieces) Aluminum Strut Channel Nut w/ Spring - 1/4”-20 thread
$41.60 (8 pieces) Aluminum Strut Channel Bracket - 90 Degree 2-1/4” length
TOTAL:
$339.10 For Aluminum Strut, Brackets and Nuts plus hardware
$291.74 For Powder-coated Steel Strut, Brackets, and Nuts plus hardware

Corner bracket mounted on the interior at the front cross-member. LED Light bar bolted to the front face. Lots of bugs at no additional charge.

Corner bracket detail, LED Light bar, and spacer on the lengthwise rail

Eye Bolt (for awning), corner bracket, and spacer at the rear of the rack
Did we forget something? Do you have questions? Shoot us a comment below!